CARDING THEROY AND THE BASIC ACTION IN CARDING MACHINE

BASIC CARDING ACTIONS

Basically, there are two action in carding machine first , one is carding action (which take place between flats and main cylinder of carding machine) and the second one is the stripping action (which take place between Taker-in and the main cylinder of the carding machine ).    

 Carding action :

In this action the fiber separation process from the fiber tuft is carried out. By held the in between the two wire surface . Now the required condition to carry out carding action are following :-

1. The first condition is that there should be always two wire surface facing each other and they should have the minimum distance of 0.3mm in between them.

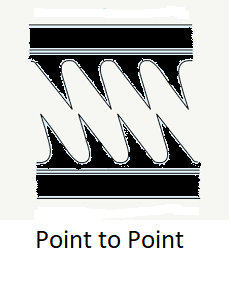
2. The second condition is that there is always point  to point facing in between those two wired surface.

3. The third condition is that the interacting surface should move in same direction or in opposite direction. if there are moving in same direction then the charged surface should have to move at higher linear velocity.   

stripping action of carding machine


Stripping action :

In this action the fiber transfer process from one wire surface to other . The necessary condition for stripping actions of fibers are following :-

1. The first condition is that there should be always two wire surface facing each other and they should have minimum distance of 0.3mmin between them.

2. The second condition is that there is always point to back facing in between those two wired surface.

3.  The third condition is that the interacting surface should move in same direction or in opposite direction. if there are moving in same direction then the charged surface should have to move at higher linear velocity.  

Theories of  Carding Machine :-

There are three carding theories which are following  :-

1. Classical theory 

2. Strang's  theory 

3. Kaufman 's theory

1. Carding theory :

 The basic carding and stripping action is know as the carding theory and these action are discussed above in the topic (basic carding action ) . This theory state that the fiber are carded  in between two oppositely inclined wire surface moving at a speed and there is some inclination between the wired points which causes the sliding of the components of fiber tension acting, on the fiber is strong enough to move the fiber down to the wire base. There are some drawback in this theory that is does not take the centrifugal force and the presence of the air current due to rotating elements . The carding force which presses the fibers toward the base of the wire is too small in comparison to components of fiber tufts between  the working surface and centrifugal force acting on the fiber tuft. 

2. Strang's theory : 

In this theory of carding machine is also know as boundary layer theory. This theory state that in the card the cylinder is considered to be enclosed from all the sides by flats , back and front plate ,  licker-in , doffer and cylinder under ceasing and rotate in medium of still air .basically this theory tell that the series of concentric layers of air surround the cylinder and rotates along with it with different velocities. 
The major drawback of this theory is that it is in applicable in explaining the fiber transfer from licker-in to cylinder strang's theory is explaining the carding action in very unrealistic way .

3. Kaufman's theory :

humburgers theory
This theory state that as we introduce the fiber tuft into the narrow gap in between the cylinder and flats   the fiber tuft get compression force into the wire clothing of both flats and cylinder . Since the flats are stationary as compared to the fast moving cylinder . According to Kaufman calculation the compression force against the cylinder acts six time lager than the surface area of flats . The penetration of wire points into the tuft is immediately followed by the shearing action on due the greater speed difference the tufts is pulled apart into pieces .
Therefore, these are the carding theory and the basic action carried in carding machine.


PRINTING OF COTTON FABRIC WITH HAND BLOCK METHOD

To print cotton fabric with hand block method in direct style, discharge and resist style printing.

Theory : The first textile-printing technique (making impressions) was that using blocks with raised printing surfaces, which were inked and then pressed on to the fabric. By repetition, the image from a single block builds up into a complete design over the fabric area. Some early blocks were made of clay or terracotta, others of carved wood. Wooden blocks carrying design motifs were found in tombs near the ancient town in Upper Egypt. A combination of block printing and painting (usually described as penciling) was used for some time. The biggest problem was that of achieving bright and fast colours. Madder (madder is a fast, rich red colour natural dye stuff obtained from the root of a herb) was the most important dye that was able to satisfy
the need.
Block making: The typical hand block print had no large, uniform areas of colour but was skillfully built up from many small coloured areas, because wooden surfaces largerthan about 10 mm in width would not give an even print. This had the advantage that a motif such as a flower would have an effect of light shade obtained from three or four blocks, each printing a different depth of the same colour or shade. A fairly hard wood was required, such as pear wood, and four or five layers were usually glued together with the grain running in different directions. The design was traced on to the surface and a fine chisel used to cut away the nonprinting areas
to a depth of perhaps 1 cm. To obtain more detail from some blocks, strips and pins of copper or brass (more usually) were hammered into the wood.

Different techniques of hand block printing:

Discharge printing: In this technique before the printing is carried out first the fabric is dyed to desired colour, then the dye is to be removed at selected places by chlorine or other colour destroying chemicals (which yields a white pattern on a coloured ground) from the part of the fabric where the design is to be printed. Coloured patterns on a dyed ground are possible in this method by adding to the bleaching paste a dye not affected by the bleaching agent used, so that another colour is substituted for white on the dyed ground.

Direct block printing: The fabric is first bleached and then dyed with desired colour. After that the hand block printing is done with carved wooden blocks in borders and in the inside of the fabric.

Resist printing: In resist printing the design desired, is printed on the fabric with a material (Wax or resin) which will resist dyeing. The fabric is then dyed with desired colour. Washing after dyeing removes the resist material in which design is printed leaving a white pattern like the following print effect is achieved on the fabric.

 (resist printing)

WEAVING

Objectives of Winding


To wrap the forming yarn on a package in a systematic manner or to transfer yarn from one supply package to another in such a way that the latter is adequately compact and usable for the subsequent operations.


To remove the objectionable faults present in original yarns.
Most of the textile winding operations deal with the conversion of ringframe bobbins into cones or cheeses. One ringframe bobbin (cop) typically contains around 100 grams of yarn. If the yarn count is 20 tex, then the length of yarn in the package will be around 5 km. As the warping speed in modern machines is around 1000 m/min, direct use of ringframe bobbins in warping will necessitate package change after every 5 minutes. This will reduce the running efficiency of warping machine. Therefore, ringframe bobbins are converted into bigger cones (mass around 2 kgs or more) or cheeses.
Ringframe bobbins are also not useable as transverse or weft packages because they have empty core which will require bigger size of the shuttle and thereby causing problem in shedding operations. Therefore, for shuttle looms, pirn winding operations are carried out to manufacture weft packages from cones.
Two basic motions are required for effective winding. First, the rotational motion of the package, on which the yarn is being wound, is required. This rotational motion pulls out the yarn from the supply package. Second, the traverse motion is requited so that the entire width of the package is used for winding the yarn. In the absence of the latter, yarns will be wound at the same region by placing one coil over another which is not desirable.
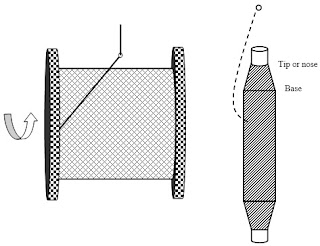
During winding, the yarn can be withdrawn from the supply packages in two ways as depicted in Figure 2.1.


Side withdrawal


Over-end withdrawal
yarn withdrawal , type of withdrawal
Figure 2.1: Side withdrawal and over-end withdrawal
Side withdrawal is preferable for flanged packages as the yarn does not touch with the flanges. The package has to rotate during the yarn withdrawal. However, for ringframe bobbins, over end withdrawal is performed by keeping the package in almost upright conditions. As one coil comes out from the ringframe bobbin, one twist is either added or subtracted from parent yarn depending on direction of twist in the yarn.
Types of Wound Packages
There could be three types of wound packages based on the angle at which the yarns are laid on the package.
  • Parallel wound package
  • Nearly parallel wound package
  • Cross wound package
Figure 2.2 depicts various types of wound packages.
Figure 2.2: Various types of wound packages
In parallel wound package, yarns are laid parallel to each other. This helps to maximize the yarn content in the package. However, parallel wound packages suffer from the problem of stability and layers of coils can collapse specially from the two sides of the package. Therefore, double flanged packages are sometimes used for parallel wound packages.
Example: Weaver’s beam, warper’s beam
In nearly parallel wound package, successive coils of yarn are laid with a very nominal angle. The rate of traverse is very slow in this case.
In cross wound package, yarns are laid on the package at considerable angle. As the coils crosses each other very frequently, the package content is lower than that of parallel wound package. However, cross wound package provides very good package stability as the coils often change their direction at the edges of the package.
Example: Cones, Cheeses.
Important Definitions in Winding
Wind: It is the number of revolutions made by the package (i.e. number of coils wound on the package) during the time taken by the yarn guide to make a traverse in one direction (say from left to right) across the package.
Traverse ratio or wind ratio or wind per double traverse: It is the number of revolutions made by the package (i.e. number of coils wound on the package) during the time taken by the yarn guide to make a to and fro traverse. This to and fro traverses of the yarn guide from left to right and back from right to left is known as double traverse.
Traverse ratio= 2× Wind
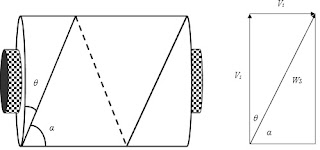
Angle of wind ( θ ) : It is the a ngle made by the yarn with the sides of the package (Figure 2.3). If surface and traverse speeds are Vs and Vt respectively, then


Coil angle ( α ) : It is the a ngle made by the yarn with the axis of the package (Figure 2.3). The coil angle and angle of wind are complementary angles as they add up to 90°.
coil angle , winding speed
Figure 2.3: Angle of wind and coil angle
The net winding speed can be obtained by the resultant vector of surface speed (Vs) and traverse speed (Vt ).
Winding Machine
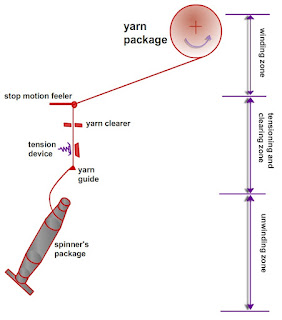
Figure 2.4 depicts the simplified view of a winding machine. It has three main zones.
  • Uniwinding zone
  • Yarn tensioning and clearing zone
  • Winding zone
winding machine diagram
Figure 2.4: Zones of winding machine
In the unwinding zone, yarns are unwound from the supply package which is ringframe bobbin in most of the cases. Yarn balloon is formed due to the high speed unwinding of yarn from the supply package. Unwinding tension varies continuously as the winding point shifts from tip to base 0of a ringframe bobbin and vice versa. Besides, the height of the balloon also increases as the supply package becomes empty.
In the second zone, tensions are applied on the yarns by using tensioners so that yarns are wound on the package with proper compactness. The objectionable yarn faults as well as other contaminants (coloured and foreign fibres) are also removed by using optical or capacitance based yarn clearer.
In the third and final zone, yarns are wound on the package by means of rotational motion of the package and traverse motion of the yarn guide. Based on the operating systems employed in the winding zone, two major winding principles have evolved.


For more see the video at :- click here